Letterhead Printing Tips Free Letterhead Creator
 Letterhead Printing Tips for Free Letterhead Creator when making your own free letterhead of course you want it to line up and print out correctly on your paper.
Before printing you must remove the headers and footers and set the margins correctly so everything will fit on the letterhead paper. The directions and pictures below explain how to set your printing properties for correct printing.
Letterhead Printing Tips for Free Letterhead Creator when making your own free letterhead of course you want it to line up and print out correctly on your paper.
Before printing you must remove the headers and footers and set the margins correctly so everything will fit on the letterhead paper. The directions and pictures below explain how to set your printing properties for correct printing.
Letterhead Printing Tips for Free Letterhead Creator
-
For IE8+ and Firefox:
Go to File, then Page Setup, select the Print Background Colors and Images box, clear the Enable Shrink to Fit box for IE. Under the section labeled Headers and Footers set all margins to .5. Set all the Headers and Footers to -Empty- or Blank. -
For Internet Explorer 7 and below:
Go to File, then Page Setup find the section labeled Headers and Footers. So you can return it to its original state copy down on a piece of paper the characters listed under the Header and Footer fields. Then delete all the characters in the Header and Footer fields. See the first image below as an example of what you may find entered there.
Next you want to set the top, right, bottom and left margins to 0.5. View the second image below as an example of how it should look when you are finished. -
All Browsers:
Assuming you sized the letterhead correctly if the margins are set incorrectly when you print the letterhead you will end up with the letterhead being down too low on the page and/or the letterhead cut off on the right side.
If after removing the header and footer and setting the margins the letterhead prints too far up on the paper you can use the Top Margin setting on the Preview page to push it down. A larger number will move them down more than a smaller number.
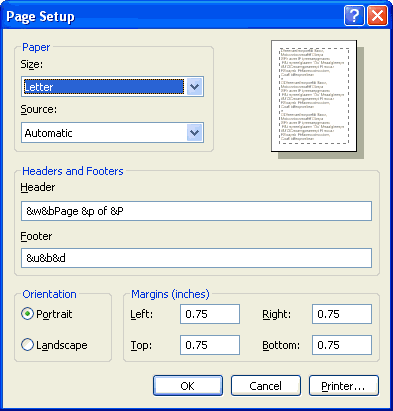
An example of what you may find in your IE7 page setup properties tab.
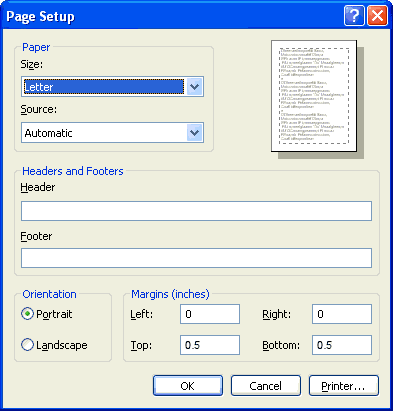
How it should look when you are finished.